Create and Manage Users
You can create users and assign them roles and permissions in the Business Portal. The role-based access (RBAC) feature in the Business Portal provides a fine-grained access control mechanism. The Business Portal includes several pre-defined roles using which you can apply permission sets easily.
Only the Admin users can add and manage users.
This article talks about:
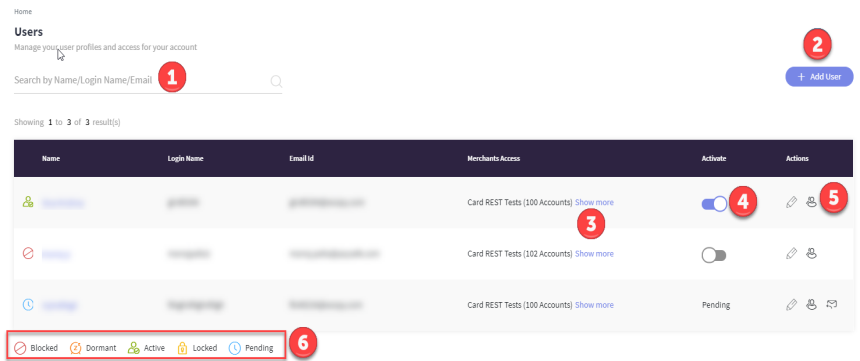
From Users page, you can create and manage users in the Business Portal if you have Administrator rights. You can search users by name, email, or login name.
Explore the User Interface
-
Search for users by name / login name / email.
-
Click + Add User to add a new user.
-
Click Show more to view the merchant's accounts, role, permissions, and actions.
-
Click Activate/Deactivate to activate or deactivate a user.
-
Click the pencil icon to edit the user details. Click the clone icon to clone the user profile and create another user with similar permissions.
-
View the status of the User
-
A resend icon appears if the user did not activate the profile.
Predefined Roles
The Business Portal includes several pre-defined roles using which you can apply permission sets easily.
- Admin - The admin role has access to modules like Users, Integrate, Transactions, Account Statement, Virtual Terminal, Digital Invoicing, Configuration.
- Operations - The operations role has access to modules like Transactions, Account Statement, and Digital Invoicing.
- Finance - The finance role has access to modules like Transactions, Account statement, Virtual Terminal, and Digital Invoicing.
- Developer - The developer role has access to modules like Integrate and Transactions.
- Custom - Using this role, you can customize the access rights for an user. Modules like Search Transactions, API Keys, Account Balance and Activity, Virtual Terminal, Digital Invoicing, and Configurations.
Add a New User
As an admin, you can create new users in your organization with specific roles and permissions. Once you create a user, the user receives an email to their inbox. The user must complete the rest of the signup process to login to the Business Portal.
Note: You can use an email id only once. The Business Portal does not allow creating two users with a single email.
-
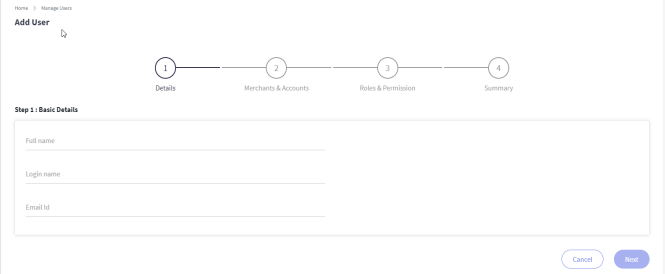
To add a new user, click Add New User.
-
Specify the full name, login name, and email and click Next.
-
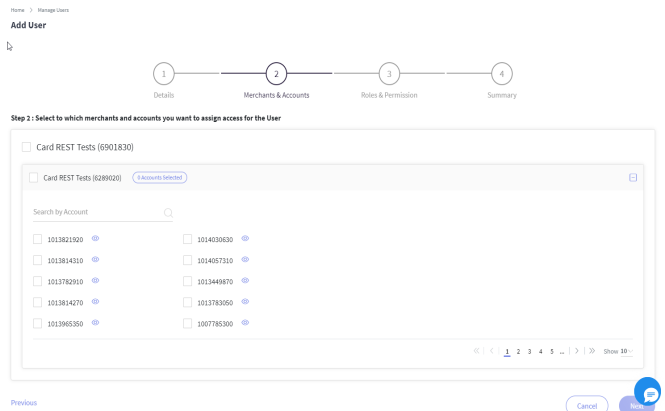
Select the merchants and associated accounts. You can select all the accounts associated to a merchant by clicking at the MLE level.
-
Click Next. The Roles & Permission screen appears.
-
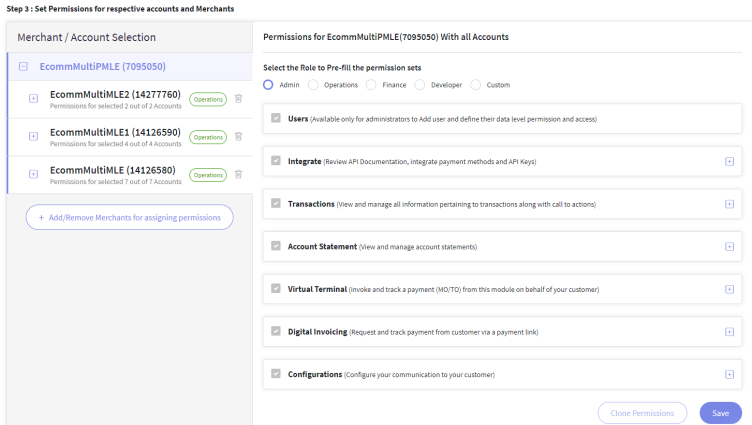
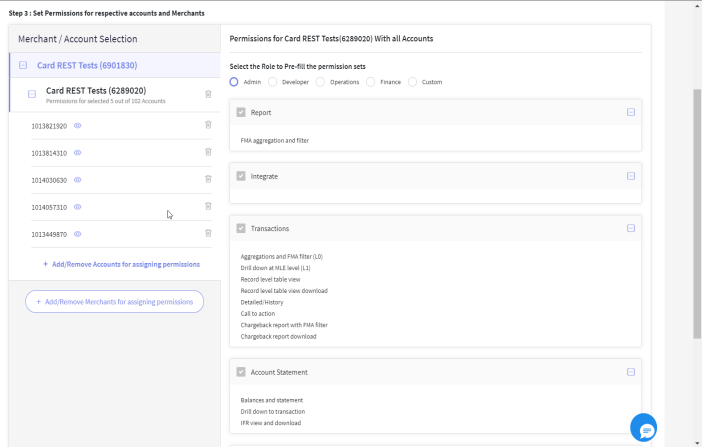
Select a role (admin, developer, operations, finance, and custom) to pre-fill the permission sets. You can use this option to pre-fill the permission sets and do not want to manually select the permission sets.
-
Suppose you want to apply permissions for multiple MLEs at a time, you can use the Clone Permissions option.
-
If you need additional permissions, contact Merchant Services to enable them.
-
-
Click Custom to manually select the permission sets.
-
After selecting the permissions, click Save.
-
Review the user details and click Add User.
At this step, you can also go back using the Edit icon to the previous steps and modify the selection.
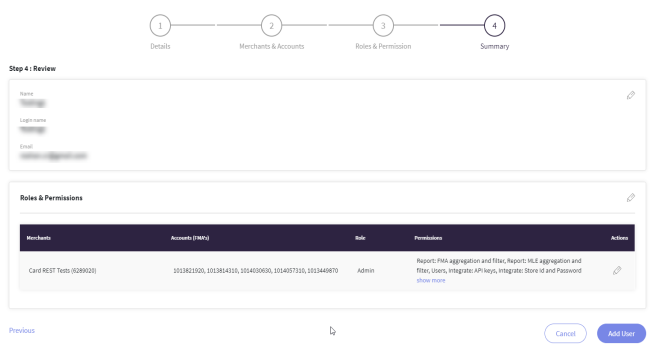
Click Add User. An email will be triggered to the user along with a link to confirm the registration.
-
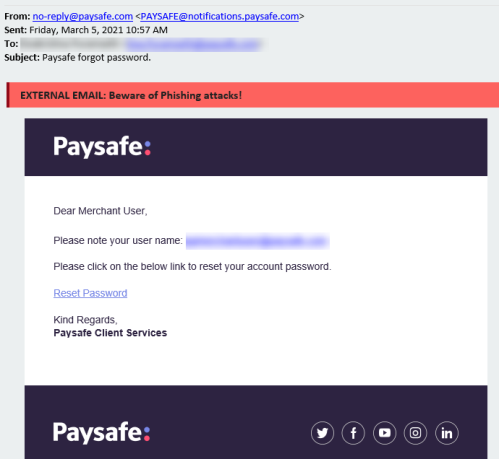
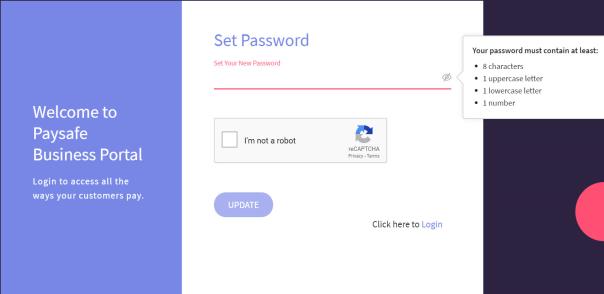
Click the Confirm Registration link. You will be prompted to create a password for your account.
-
Once you create the password, login page appears where you must login with your username and the newly created password as well as validating the captcha and clicking Update.
Define a Custom Role
The Business Portal lets you customize roles based on your requirement if predefined roles don’t meet your needs. Feature-based access control provides you a lot of flexibility and control in terms of defining the permissions. Using a custom role, you can provide access only to specific features in the Business Portal based on the scope of permissions set for each entity. Using a Custom role, you can define permission for modules like Search Transactions, API Keys, Account Balance and Activity, Virtual Terminal, Digital Invoicing, and Configurations.
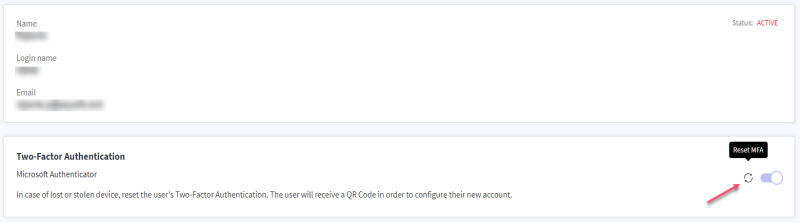
Reset Two-Factor Authentication (2FA)
In case of stolen or lost mobile device, a sub-user can request from the admin user to reset the 2FA in the Users menu.
Note: Only an admin user can reset the 2FA. If you are an admin and you need to reset your 2FA, please contact the Operations team for help.
-
From the Users page, click on the user name.
-
Click the Reset icon as shown in the below screen. This will send a new email with instructions to the email ID of the user and they can reconfigure the 2FA in the next login.
Note: The reset icon is available only if the user already has 2FA activated.